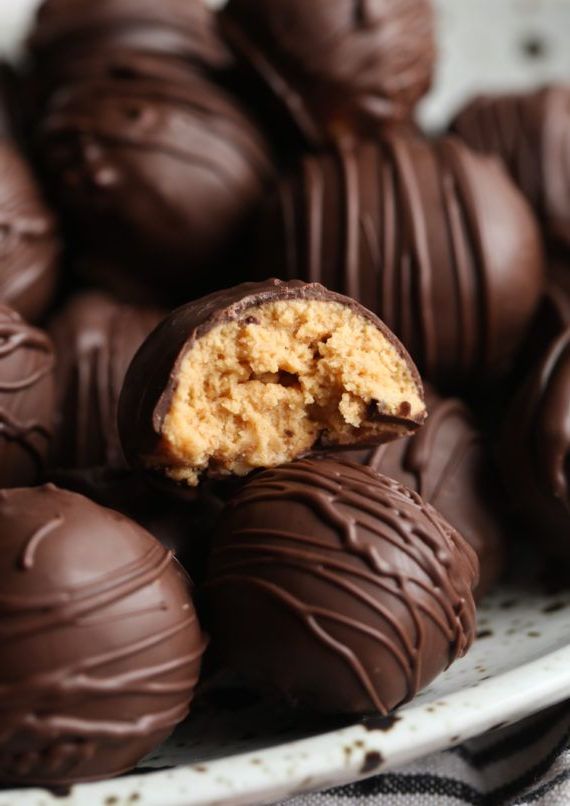
The first time I tasted these chocolate peanut butter balls was at my grandmother’s house during a holiday gathering. One bite of the creamy peanut butter filling encased in a snappy chocolate shell, and I was instantly hooked. They reminded me of store-bought peanut butter cups, but with an even more decadent, homemade quality that made them impossible to resist.
Over the years, I’ve perfected this recipe, finding the ideal ratio of peanut butter to powdered sugar that creates that melt-in-your-mouth texture while still holding its shape. These little treats have become a staple at my holiday gatherings, and guests always light up when they spot them on the dessert table – they’re usually the first treat to disappear!
What makes these chocolate peanut butter balls truly special is their versatility. They’re elegant enough for holiday gifting but simple enough for a weekend treat. The best part? You only need 5 basic ingredients to create something that tastes professionally made.
Why You’ll Love These Chocolate Peanut Butter Balls
- No-bake simplicity – Perfect for busy holidays or hot summer days
- Make-ahead friendly – Actually taste better after a day in the refrigerator
- Freezer-friendly – Prepare weeks ahead for stress-free entertaining
- Customizable – Easy to adapt with different mix-ins or coatings
- Kid-friendly project – Little hands can help roll the balls
- Gift-worthy – Perfect for holiday treat boxes or homemade presents
- Crowd-pleaser – The classic chocolate-peanut butter combination is universally loved
These little bites of heaven strike the perfect balance between sweet and salty, creamy and crunchy. The interior is velvety smooth while the chocolate exterior provides a satisfying snap when you bite into it.
Ingredients for Chocolate Peanut Butter Balls
- 1½ cups creamy peanut butter – The star of the show
- ½ cup unsalted butter, softened – Adds richness and helps with texture
- 3 cups powdered sugar – Sweetens and creates the perfect consistency
- 1 teaspoon vanilla extract – Enhances the flavor profile
- 12 oz semi-sweet chocolate chips – For the perfect chocolate coating
- 2 tablespoons vegetable shortening – Creates a smooth, glossy coating that sets well
Optional Ingredients
- 1 cup Rice Krispies cereal or graham cracker crumbs – For added texture
- ¼ teaspoon salt – If using natural peanut butter
- Sprinkles, chopped nuts, or flaky sea salt – For decorating
Ingredient Notes and Substitutions
For the peanut butter: Conventional creamy peanut butter (like Jif or Skippy) works best in this recipe as it has a consistent texture. Natural peanut butter can work too, but you may need to adjust the powdered sugar amount and add a pinch of salt.
For the chocolate: Semi-sweet chocolate provides the perfect balance, but you can substitute milk chocolate for a sweeter treat or dark chocolate for a more sophisticated flavor.
For the shortening: This helps create a smoother chocolate coating that doesn’t crack when you bite into it. In a pinch, coconut oil can be substituted, though it may result in a slightly softer coating.
For dietary restrictions: Use dairy-free butter and chocolate chips for a dairy-free version. Sunbutter or almond butter can replace peanut butter for those with peanut allergies.
How to Make Chocolate Peanut Butter Balls
These delicious treats come together in a few simple steps. The process is easy enough for kitchen beginners but yields results that look professionally made.
Step 1: Prepare the Peanut Butter Mixture
In a large mixing bowl, combine the softened butter and peanut butter. Use an electric mixer to beat until smooth and well combined, about 2 minutes.
Add the vanilla extract and mix to incorporate.
Gradually add the powdered sugar, one cup at a time, mixing well between additions. The mixture will become thick and somewhat dry – this is exactly what you want. It should hold its shape when rolled but still be pliable.
If adding Rice Krispies or graham cracker crumbs for texture, fold them in now with a sturdy spatula.
Pro tip: If your mixture is too sticky to roll, refrigerate it for 15-20 minutes to firm up slightly.
Step 2: Form the Balls
Line a baking sheet with parchment paper.
Scoop tablespoon-sized portions of the peanut butter mixture and roll between your palms to form smooth balls. Place them on the prepared baking sheet.
Pro tip: A small cookie scoop ensures uniform size for even chocolate coating and a professional appearance.
Step 3: Chill the Peanut Butter Balls
Place the baking sheet in the refrigerator and chill for at least 1 hour, or until the balls are firm. This crucial step ensures they hold their shape during dipping.
Pro tip: If you’re in a hurry, you can place them in the freezer for 20-30 minutes instead.
Step 4: Prepare the Chocolate Coating
When the peanut butter balls are almost done chilling, melt the chocolate chips and shortening in a microwave-safe bowl. Microwave in 30-second intervals, stirring well between each, until completely smooth and glossy.
Alternatively, use a double boiler for more controlled melting: place the chocolate and shortening in a heatproof bowl set over a pot of barely simmering water (making sure the bowl doesn’t touch the water), and stir until melted.
Pro tip: Working with properly tempered chocolate ensures a shiny finish and clean snap when biting into your treats.
Step 5: Dip the Balls
Remove a few peanut butter balls from the refrigerator at a time, keeping the rest chilled.
Use a fork or dipping tool to dip each ball into the melted chocolate, coating completely. Tap the fork gently on the side of the bowl to remove excess chocolate.
Place the dipped balls back onto the parchment-lined baking sheet. If adding toppings like sprinkles or sea salt, sprinkle them on immediately before the chocolate sets.
Step 6: Set the Chocolate
Return the dipped balls to the refrigerator for 15-20 minutes, or until the chocolate is completely set.
Pro tip: For a professional finish with no “puddles” of chocolate at the base, you can place the dipped balls on a wire rack over parchment paper initially, then transfer to a clean parchment sheet once the excess chocolate has dripped off.
Step 7: Store or Serve
Once set, the chocolate peanut butter balls can be served immediately or stored in an airtight container.
Tips for Perfect Chocolate Peanut Butter Balls Every Time
- Keep ingredients cool – Work in a cool kitchen and handle the peanut butter mixture minimally to prevent it from becoming too soft
- Use room temperature butter – But not melted! Softened butter incorporates better without making the mixture too loose
- Double-dip for protection – For a more professional look and better preservation, dip once, let set slightly, then dip again
- Use a fork or dipping tool – These allow excess chocolate to drain while maintaining a smooth coating
- Temper your chocolate properly – For that perfect snap and shine (see FAQ section for tips)
- Work in small batches – Keep the majority of your peanut butter balls refrigerated while working with a few at a time
Creative Variations for Chocolate Peanut Butter Balls
Want to put your own spin on this classic treat? Try these delicious variations:
Crunchy Chocolate Peanut Butter Balls: Add ½ cup chopped peanuts to the filling mixture.
Pretzel Surprise: Press a small pretzel piece into the center of each ball before chilling for a salty crunch.
Chocolate Peanut Butter Cup Balls: Use milk chocolate for coating and press into mini muffin tins to create a cup shape.
Mocha Peanut Butter Balls: Add 1 tablespoon instant espresso powder to the melted chocolate.
Coconut Peanut Butter Balls: Roll the balls in toasted coconut flakes after dipping in chocolate.
Peanut Butter S’mores Balls: Mix ¼ cup crushed graham crackers into the peanut butter mixture and fold in mini marshmallows.
White Chocolate Drizzle: After the dark chocolate coating has set, drizzle with melted white chocolate for an elegant finish.
Serving Suggestions for Chocolate Peanut Butter Balls
These versatile treats can be presented in several ways:
- Holiday cookie platters – Arrange with other homemade candies and cookies
- Dessert charcuterie board – Pair with fruits, nuts, and other small sweets
- After-dinner treat – Serve with coffee or dessert wine
- Homemade gifts – Package in decorative boxes or mason jars
- Party favors – Place two or three in a small cellophane bag tied with ribbon
- Ice cream topping – Chop and sprinkle over vanilla ice cream
- Standalone dessert – Arrange on a beautiful platter with fresh mint for color
For special occasions, try serving them alongside a peanut butter dipping sauce or chocolate fondue for an interactive dessert experience.
How to Store and Freeze Chocolate Peanut Butter Balls
Room temperature storage: These can be kept in an airtight container at cool room temperature (below 70°F) for 2-3 days.
Refrigerator storage: Store in an airtight container with parchment paper between layers for up to 2 weeks. The cool temperature helps maintain the perfect texture.
Freezer storage: Chocolate peanut butter balls freeze beautifully! Place in an airtight container with parchment paper between layers and freeze for up to 3 months.
Thawing: Allow frozen balls to thaw in the refrigerator for several hours, or at room temperature for about 30 minutes before serving.
Pro tip: For gifting or serving, only remove from refrigeration what you plan to use, as repeated temperature changes can cause the chocolate to bloom (develop a whitish appearance) which doesn’t affect taste but impacts appearance.
Why This Chocolate Peanut Butter Balls Recipe Works
After making countless batches of peanut butter balls over the years, I’ve found this version consistently delivers perfect results because:
- The ratio of peanut butter to powdered sugar creates the ideal consistency – firm enough to hold shape but still creamy when eaten
- The addition of butter enhances the flavor and provides a melt-in-your-mouth quality
- Chilling the balls before dipping ensures they maintain their shape during the chocolate coating process
- Adding shortening to the chocolate creates a smooth coating that doesn’t crack when bitten into
- The vanilla extract adds depth of flavor that elevates these beyond simple candy
These chocolate peanut butter balls have become my most requested recipe during the holidays, and for good reason. They require minimal ingredients and no special equipment, yet they yield impressive results that taste like they came from a gourmet candy shop.
Whether you’re making them for a special occasion or just to satisfy a chocolate and peanut butter craving, these little treats never disappoint. Their perfect balance of sweet and salty, creamy and crunchy makes them irresistible to everyone who tries them.
Chocolate Peanut Butter Balls Recipe
Description
These no-bake chocolate peanut butter balls feature a velvety smooth peanut butter center coated in a snappy chocolate shell. They're perfect for holiday gifting dessert platters or whenever you're craving the classic combination of chocolate and peanut butter.
Ingredients
Instructions
-
1. In a large bowl, beat peanut butter and softened butter until smooth.
-
2. Add vanilla extract and mix to combine.
-
3. Gradually add powdered sugar, mixing well after each addition, until mixture is firm enough to hold shape.
-
4. Line a baking sheet with parchment paper. Scoop tablespoon-sized portions and roll into balls. Place on prepared sheet.
-
5. Refrigerate balls for at least 1 hour, until firm.
-
6. In a microwave-safe bowl, melt chocolate chips and shortening in 30-second intervals, stirring between each, until smooth.
-
7. Using a fork or dipping tool, dip chilled peanut butter balls into melted chocolate, tapping off excess.
-
8. Return dipped balls to parchment-lined sheet. If adding toppings, sprinkle them on immediately.
-
9. Refrigerate for 15-20 minutes until chocolate is completely set.
-
10. Store in an airtight container in the refrigerator for up to 2 weeks..
Nutrition Facts
Servings 36
- Amount Per Serving
- Calories 180kcal
- % Daily Value *
- Total Fat 12g19%
- Saturated Fat 5g25%
- Cholesterol 8mg3%
- Sodium 55mg3%
- Total Carbohydrate 16g6%
- Sugars 14g
- Protein 3g6%
* Percent Daily Values are based on a 2,000 calorie diet. Your daily value may be higher or lower depending on your calorie needs.
Note
These treats can be stored in an airtight container in the refrigerator for up to 2 weeks or frozen for up to 3 months. To prevent the chocolate from looking cloudy avoid temperature fluctuations when storing.


